(Added table of stage data. May remove enemy column.) Tag: rte-source |
No edit summary Tags: Visual edit apiedit |
||
| (15 intermediate revisions by 7 users not shown) | |||
| Line 1: | Line 1: | ||
| + | {{Dungeon|{{{1|Info}}} |
||
| − | {{Incomplete|This article requires stage data.}} |
||
| + | |DungeonName=Disarm |
||
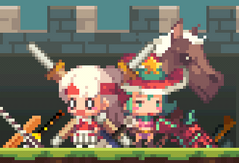
| − | [[File:Ancient Dungeon Disarm.png|thumb|312x312px|20F, Ancient Dungeon Disarm. Leon and D'Artagnan are final bosses of the dungeon.|centre]] |
||
| + | |NotAllow=warriors, hunters |
||
| − | '''Disarm''' is 20-level-depth Ancient dungeon of Crusaders Quest. Warriors and Hunters cannot enter. Final bosses are [[Leon]] and [[D'Artagnan]]. Legendary heroes can be obtained by clearing dungeon. |
+ | |Intro='''Disarm''' is a 20-level-depth Ancient dungeon of Crusaders Quest. Warriors and Hunters cannot enter. Final bosses are [[Leon]] and [[D'Artagnan]]. Legendary heroes can be obtained by clearing the dungeon. |
| − | == Stages == |
||
| ⚫ | |||
| − | {| border="1" cellpadding="1" cellspacing="1" class="article-table" style="width: 500px;" |
||
| ⚫ | |||
| − | |- |
||
| ⚫ | |||
| − | ! scope="col"|Floor |
||
| + | |Resource2 ={{Resource|key|2}} |
||
| − | ! scope="col"|Floor Name |
||
| ⚫ | |||
| − | ! scope="col"|Resource Cost |
||
| ⚫ | |||
| − | ! scope="col"|Enemies |
||
| + | |Resource3 ={{Resource|key|2}} |
||
| − | ! scope="col"|Reward |
||
| ⚫ | |||
| − | ! scope="col"|Repeat Reward |
||
| ⚫ | |||
| − | |- |
||
| + | |Resource4 ={{Resource|key|2}} |
||
| − | |B1F |
||
| − | |Disarm-1 |
||
| ⚫ | |||
| − | | |
||
| ⚫ | |||
| ⚫ | |||
| − | |- |
||
| − | |B2F |
||
| − | |Disarm-2 |
||
| − | | style="height: 40px;" | {{Resource|key|2}} |
||
| − | | |
||
| ⚫ | |||
| ⚫ | |||
| − | |- |
||
| − | |B3F |
||
| − | |Disarm-3 |
||
| − | | style="height: 40px;" | {{Resource|key|2}} |
||
| − | | |
||
| ⚫ | |||
| ⚫ | |||
| − | |- |
||
| − | |B4F |
||
| − | |Disarm-4 |
||
| − | | style="height: 40px;" | {{Resource|key|2}} |
||
| − | | |
||
| − | | style="height: 40px;" | {{Hero|1004}} OR {{Hero|Bard}} |
||
| − | | style="height: 40px;" | {{Hero|1004}} OR {{Hero|Bard}} |
||
| − | |- |
||
| − | |B5F |
||
| − | |Disarm-5 |
||
| − | | style="height: 40px;" | {{Resource|key|2}} |
||
| − | | |
||
| ⚫ | |||
| ⚫ | |||
| − | |- |
||
| − | |B6F |
||
| − | |Disarm-6 |
||
| − | | style="height: 40px;" | {{Resource|key|3}} |
||
| − | | |
||
| ⚫ | |||
| ⚫ | |||
| − | |- |
||
| − | |B7F |
||
| − | |Disarm-7 |
||
| − | | style="height: 40px;" | {{Resource|key|3}} |
||
| − | | |
||
| ⚫ | |||
| ⚫ | |||
| − | |- |
||
| − | |B8F |
||
| − | |Disarm-8 |
||
| − | | style="height: 40px;" | {{Resource|key|3}} |
||
| − | | |
||
| ⚫ | |||
| ⚫ | |||
| − | |- |
||
| − | |B9F |
||
| − | |Disarm-9 |
||
| − | | style="height: 40px;" | {{Resource|key|3}} |
||
| − | | |
||
| − | | style="height: 40px;" | {{Hero|1012}} OR {{Hero|Owner}} |
||
| − | | style="height: 40px;" | {{Hero|1012}} OR {{Hero|Owner}} |
||
| − | |- |
||
| − | |B10F |
||
| − | |Disarm-10 |
||
| − | | style="height: 40px;" | {{Resource|key|3}} |
||
| − | | |
||
| ⚫ | |||
| ⚫ | |||
| − | |- |
||
| − | |B11F |
||
| − | |Disarm-11 |
||
| − | | style="height: 40px;" | {{Resource|key|4}} |
||
| − | | |
||
| ⚫ | |||
| ⚫ | |||
| − | |- |
||
| − | |B12F |
||
| − | |Disarm-12 |
||
| − | | style="height: 40px;" | {{Resource|key|4}} |
||
| − | | |
||
| ⚫ | |||
| ⚫ | |||
| − | |- |
||
| − | |B13F |
||
| − | |Disarm-13 |
||
| − | | style="height: 40px;" | {{Resource|key|4}} |
||
| − | | |
||
| ⚫ | |||
| ⚫ | |||
| − | |- |
||
| − | |B14F |
||
| − | |Disarm-14 |
||
| − | | style="height: 40px;" | {{Resource|key|4}} |
||
| − | | |
||
| − | | style="height: 40px;" | {{Hero|1026}} OR {{Hero|Marksman_Instructor}} |
||
| − | | style="height: 40px;" | {{Hero|1026}} OR {{Hero|Marksman_Instructor}} |
||
| − | |- |
||
| − | |B15F |
||
| − | |Disarm-15 |
||
| − | | style="height: 40px;" | {{Resource|key|4}} |
||
| − | | |
||
| ⚫ | |||
| ⚫ | |||
| − | |- |
||
| − | |B16F |
||
| − | |Disarm-16 |
||
| − | | style="height: 40px;" | {{Resource|key|5}} |
||
| − | | |
||
| ⚫ | |||
| ⚫ | |||
| − | |- |
||
| − | |B17F |
||
| − | |Disarm-17 |
||
| − | | style="height: 40px;" | {{Resource|key|5}} |
||
| − | | |
||
| ⚫ | |||
| ⚫ | |||
| − | |- |
||
| − | |B18F |
||
| − | |Disarm-18 |
||
| − | | style="height: 40px;" | {{Resource|key|5}} |
||
| − | | |
||
| ⚫ | |||
| ⚫ | |||
| − | |- |
||
| − | |B19F |
||
| − | |Disarm-19 |
||
| − | | style="height: 40px;" | {{Resource|key|5}} |
||
| − | | |
||
| − | | style="height: 40px;" | {{Hero|1024}} OR {{Hero|Space Cadet G}} |
||
| − | | style="height: 40px;" | {{Hero|1024}} OR {{Hero|Space Cadet G}} |
||
| − | |- |
||
| − | |B20F |
||
| − | |Disarm-20 |
||
| − | | style="height: 40px;" | {{Resource|key|5}} |
||
| − | | |
||
| ⚫ | |||
| − | | style="height: 40px;" | {{Hero|1901}} OR {{Hero|D'Artagnan}} |
||
| ⚫ | |||
| + | |Reward4b ={{Reward|hero|1★}} {{HeroImage|Treasure Hunter}} or {{HeroImage|Bard}} |
||
| − | == Tips == |
||
| + | |Resource5 ={{Resource|key|2}} |
||
| ⚫ | |||
| ⚫ | |||
| + | |Resource6 ={{Resource|key|3}} |
||
| ⚫ | |||
| ⚫ | |||
| + | |Resource7 ={{Resource|key|3}} |
||
| ⚫ | |||
| ⚫ | |||
| + | |Resource8 ={{Resource|key|3}} |
||
| ⚫ | |||
| ⚫ | |||
| + | |Resource9 ={{Resource|key|3}} |
||
| + | |Reward9b ={{Reward|hero|2★}} {{HeroImage|Apprentice Knight}} or {{HeroImage|Owner}} |
||
| ⚫ | |||
| + | |Resource10 ={{Resource|key|3}} |
||
| ⚫ | |||
| ⚫ | |||
| + | |Resource11 ={{Resource|key|4}} |
||
| ⚫ | |||
| ⚫ | |||
| + | |Resource12 ={{Resource|key|4}} |
||
| ⚫ | |||
| ⚫ | |||
| + | |Resource13 ={{Resource|key|4}} |
||
| ⚫ | |||
| ⚫ | |||
| + | |Resource14 ={{Resource|key|4}} |
||
| + | |||
| + | |Reward14b ={{Reward|hero|3★}} {{HeroImage|Space Cadet R}} or {{HeroImage|Marksman Instructor}} |
||
| + | |Resource15 ={{Resource|key|4}} |
||
| ⚫ | |||
| ⚫ | |||
| + | |Resource16 ={{Resource|key|5}} |
||
| ⚫ | |||
| ⚫ | |||
| + | |Resource17 ={{Resource|key|5}} |
||
| ⚫ | |||
| ⚫ | |||
| + | |Resource18 ={{Resource|key|5}} |
||
| ⚫ | |||
| ⚫ | |||
| + | |Resource19 ={{Resource|key|5}} |
||
| + | |||
| + | |Reward19b ={{Reward|hero|3★}} {{HeroImage|Space Cadet G}} or {{HeroImage|Space Swordsman}} |
||
| + | |Resource20 ={{Resource|key|5}} |
||
| ⚫ | |||
| + | |Reward20b ={{Reward|hero|Legend}} {{HeroImage|Leon}} or {{HeroImage|D'Artagnan}} |
||
| + | |Tips=Certain stages of this dungeons (mainly the ones with monster enemies) will introduce a swarm of monsters or big monsters, along with a turret in the rear constantly dealing AoE damage. Make sure of heroes that can attack the rear such as [[Archers]], or better, heroes with AoE attacks. |
||
| + | |||
| + | The final stage of this dungeon isn't really that hard, the only thing you have to look out for are Leon's and D'Artagnan's skills. Use one of the [[Paladins]] to tank their attacks while focusing on attacking with all your might. |
||
| + | |||
| + | {{HeroFlair |
||
| + | |TeamName=Recommended Team for B20F |
||
| + | |Hero1=Black Witch Dorothy |
||
| + | |Hero2=Nightingale of Light |
||
| + | |Hero3=Roland of Honor |
||
| + | |SpecialSkill3=Shield of Invincibility |
||
| ⚫ | |||
| + | {{HeroFlair |
||
| + | |TeamName=Recommended Team |
||
| + | |Hero1=Emperor Alexander |
||
| + | |Hero2=Cat Master Mew |
||
| + | |Hero3=Archon the Enlightened |
||
| + | }} |
||
| ⚫ | |||
<gallery> |
<gallery> |
||
| − | Dartagnan acquired.png|D'Artagnan is |
+ | Dartagnan acquired.png|D'Artagnan is obtainable in the last level of Disarm |
| + | Ancient Dungeon Disarm.png|20F, Ancient Dungeon Disarm. |
||
</gallery> |
</gallery> |
||
| + | }} |
||
| + | |||
| + | <div class="move module"> |
||
| + | ==Relative Movie== |
||
| + | [[File:Crusaders Quest Disarm-20 again|thumb|center|268px]] |
||
| + | </div> |
||
[[Category:Ancient Dungeon]] |
[[Category:Ancient Dungeon]] |
||
Latest revision as of 03:20, 6 January 2016

Introduction
Disarm is a 20-level-depth Ancient dungeon of Crusaders Quest. Warriors and Hunters cannot enter. Final bosses are Leon and D'Artagnan. Legendary heroes can be obtained by clearing the dungeon.Warriors,Hunters cannot enter this dungeon.
Stages & Rewards
| Floor | Name | Resource Cost | Reward | Repeat Reward |
|---|---|---|---|---|
| B1F | Disarm-1 | 2 |
3000 |
660 |
| B2F | Disarm-2 | 2 |
2~3 |
2~3 |
| B3F | Disarm-3 | 2 |
2~3 |
740 |
| B4F | Disarm-4 | 2 |
1★  Hero: Treasure Hunter or  Hero: Bard
| |
| B5F | Disarm-5 | 2 |
1 |
30 |
| B6F | Disarm-6 | 3 |
5000 |
880 |
| B7F | Disarm-7 | 3 |
2~4 |
2~4 |
| B8F | Disarm-8 | 3 |
2~4 |
1060 |
| B9F | Disarm-9 | 3 |
2★  Hero: Apprentice Knight or  Hero: Owner
| |
| B10F | Disarm-10 | 3 |
1 |
50 |
| B11F | Disarm-11 | 4 |
8000 |
1310 |
| B12F | Disarm-12 | 4 |
2~4 |
2~4 |
| B13F | Disarm-13 | 4 |
2~4 |
1570 |
| B14F | Disarm-14 | 4 |
3★  Hero: Space Cadet R or  Hero: Marksman Instructor
| |
| B15F | Disarm-15 | 4 |
2 |
70 |
| B16F | Disarm-16 | 5 |
12000 |
1970 |
| B17F | Disarm-17 | 5 |
2~5 |
2~5 |
| B18F | Disarm-18 | 5 |
2~5 |
2230 |
| B19F | Disarm-19 | 5 |
3★  Hero: Space Cadet G or  Hero: Space Swordsman
| |
| B20F | Disarm-20 | 5 |
2 |
Legend  Hero: Leon or  Hero: D'Artagnan
|
Tips
Certain stages of this dungeons (mainly the ones with monster enemies) will introduce a swarm of monsters or big monsters, along with a turret in the rear constantly dealing AoE damage. Make sure of heroes that can attack the rear such as Archers, or better, heroes with AoE attacks.
The final stage of this dungeon isn't really that hard, the only thing you have to look out for are Leon's and D'Artagnan's skills. Use one of the Paladins to tank their attacks while focusing on attacking with all your might.


Gallery
")
")
